Wednesday, December 20, 2006

Well, here I am sitting in a sports bar using the internet terminal here to post another update! Sedona has been great, and we've been very busy...and tomorow I leave for my week of stamping insanity in Southern California! I hope to post a new project each day I am there!

In the meantime, here is the Chipboard Calendar that I made 4 of, one for my parents, and one for each of my siblings (I get to keep 1!!)

I CASED the one created by XXX on SCS (as usual) and she gave great directions. My coasters were a little smaller than hers, so I had to resize the calendars even more, so if anyone wants my files, leave me a comment with your email address and I will forward them!

I used a variety of stamp sets, papers and inks to create these, and had LOTS of fun designing them. They truly are VERY easy to create!! Once the pages were all stamped and assembled, I punched the holes in the top and then purchased some loose binder rings to hold the calendar's together. I of course added ribbon to the rings so they didn't look so plain!

I hope you enjoy these projects, and I will be posting many more soon, once I get my hands on some rubber again!! :-)

Have a wonderful new year everyone!

-Jana


All for now...

Ok, we're heading to the US in the morning...early! It's colder than you know what here right now (well, ok, maybe not that cold to some of you, but to this California-girl it's pretty gosh darn cold!) and I'm looking forward to some warmth!

With that in mind, here is a nice spring-y card that makes me feel a little warmer. When I first arrived in Germany I was doing an SU Diva Sister Swap for an online group of demos I belong to (many of whom have blogs listed to the right!) and one of the cards was supposed to be an emboss-resist card. Well...I didn't have a heat tool. So then I thought I'd just do ghosting with versamark and not bother embossing...but I didn't have a brayer. So, needless to say, I set aside my glossy CS with the image already stamped in versamark to wait. When my brayer finally arrived via good ole DSL, I went to town. I think I may have based the layout on one of the SCS card sketch challenges, but I can't remember which right now.

I used Lavender Lace, Elegant Eggplant, Certainly Celery, Glossy White and Whisper White cardstocks, Lavender Lace, Elegant Eggplant, Certainly Celery and versamark inks. The sets are Blossoms Abound and the butterfly is from Touch of Nature. I added some Dazzling Diamonds glitter to the butterfly to make it sparkle! And, of course a touch of ribbon!!

Ok...I will try to post some from the US, but I won't be quite as consistent...all depends on my access, and of course my access to stamps! Starting 1/1/07 I'll have access to both, and will be posting like mad!!! Expect a minimum of one post a day for the first week of January as I play with my wonderful friend and upline Rachel for a week! :-) Can't wait!!!

Have a wonderful Holiday everyone...and I hope to hear from you all in the new year!

Monday, December 18, 2006

Winter Wonderland!

Here's a quick and easy card I made using Festive Favorites because I was having so much fun with it!

Here I stamped the snowflakes from the set on the Buckaroo Blue card, then put a piece of Designer Paper from Holiday Thyme on. I stamped the snowmen in Basic Black on Whisper White, and used my aquapainter and open ink pads to add some quick color. Then, layered on Cranberry Crisp, roughed up the edges with my handy-dandy SU! cutter kit, layered on Buckaroo blue and roughed again!

Then, had to add the cute little tag as well with some frayed Silver cord! I just love this set!!!

Sunday, December 17, 2006

Simple Ornament Cards

This card (yet another CASE, this time of a great card by Nuts4levibutts - dontchya love that name?) was a really fast easy card to make taking advantage of Stampin' Up!'s wonderful Designer papers.

I used my colluzle to cut the circle, stamped the ornaments and the string to hang them on and sponged the edges. Next, I adhered my designer paper to the folded card, tied some ribbon, and popped the circle up on a couple of dimensionals. Voila! Super easy, fast card!! I just love that kind!!

I used Old Olive for the base, Holiday Thyme designer paper and Cranberry Crisp stitched grosgrain ribbon. For ink I have Old Olive, Cranberry Crisp and Going Grey. You could also add a sentiment on the lower left side of the card (which I did for one card I recently used!) And, to change it up a little, I used one of the other designs in the Holiday Thyme paper as well!

Holiday Star and March of the Penquins

This star is at the top of our Christmas Tree. Since I didn't bring ANY of our Christmas decorations from California to Germany, I"ve had to make decorations this year. This star is SUPER simple to make, and with the wonderful Holiday Thyme paper, it's fast and beautiful.

I got the inspiration from Stampin' Andrea on Splitcoast, and she found the directions on Scraplovers.com . It's a fun one to do even with kids because it is so simple, and al you need is a 6" by 6" square of cardstock or designer paper, a stapler, and some adhesive.

I'm also going to post another recent project I made for an Artist Trading Card swap I participated in. I was inspired by this card by Emilymomto3boys on Splitcoast. I just loved the little penquin and al his sparkle. So, I changed it up a little and Voila! Easy ATC's, and I also made some into full cards because, it's just so easy to do!!

The hardest part of this card is lining up the circle punches. To do this, I trimmed my Cool Carribbean CS the proper width, and just made small marks where I would later trim for the lengths. I then found the center of that square and tried to center the 1 3/8" circle punch over that center. After punching the circles, I then trimmed the squares appart. Next, I mounted the Cool Carribean CS onto the Basic Black CS, then tried to center the 1 1/4" punch inside the punched circle of the top layer. This enabled me to get a ring of black on the inside as well, which I think added a lot.

The glitter window is the easiest part...simply lay your top layers onto the bottom (I used Confetti White), stamp your inside image, then place a square of packing tape on the BACK of your top layers (on the black layer) then lay that into some glitter, being sure to press the glitter onto the tape for full coverage. Finally, adhere your top layer to the bottom centering your stamped image.

I used the Wild About You, Snow Flurries and a hostess set from last year called Small Script for stamp sets, and just Basic Black and Cool Caribbean inks.

Thursday, December 14, 2006

Bodacious Wonder!

I am just LOVING this Bodacious Bouquet stamp set. I really don't know how I held out as long as I did to get it! I have seen several beautiful samples with it on Splitcoast, and in particular many wonderful One Sheet Wonder sets, so of course I had to try myself. And it was a nice break from the Christmas Cards I've been making - altho now I have NO IDEA what I'll do with all these cards!

As I've already stated, I'm completely out of Chocolate Chip CS, so I couldn't do the color combo I really wanted, but I had also decided I need to try using Vintage Violet a little more, so I looked around for a combo I liked using that, and saw a STUNNING card on SCS using Vintage Violet with Rose Red. Of course I had to add Certainly Celery for a little gree, and some lightness.

I ended up with 8 cards in all. I decided not to use a template this time, although I usually do, and just see what the results were. They were ok. I tended to make 2 cards with a similar layout at once because that is how I cut the paper...but I guess that is ok.

So, all CS is Rose Red, Vintage Violet, Certainly Celery and of course Whisper White (it was in fact my last sheet of Whisper White - oh no!!) And same colors for ink. I used various ribbons (some Celery Organdy - both narrow and wide, as well as the vintage violet stitched grosgrain, pink gingham, and some silver cord). I used a few different background stamps, Print Pattern, Linen and Aida Cloth.

I also used the Bodacious Bouquet Dry Embossing template on a couple of cards, and LOVE the effect it gave! I'm going to have to play with that some more. I love the fact that it also has piercing templates, and so I pierced around a few of the blossoms to add some interest.

I used my beloved ticket corner punch once and put some brads in the little divots it creates. And on the last one I show here, I used the slit punch to create a scalloped border. It's actually quite easy to do - simply put your CS all the way in and punch, then move the punch over to line up at the top of the semi-circle you just punched, and punch again. In the end, you'll end up with 2 pieces of CS, one with the scallop,and one with the reverse of it. I just love the scalloped look - and have in fact finally given in an dordered the Marvy Uchida scalloped Giga punches (all 3 - circle, oval and square!) I can't wait to get them!!!

Yesterday I started a new project which was lots of fun...but I can't share photos of it until after Christmas. Suffice it to say, I'll be hitting the bier garten's here more frequently so that I can build up my collection of chipboard coasters!!! :-) I also was able to call my good friend and upline Rach last night through the computer, and with my webcam she was able to watch me stamp and see the projects I'm working on..perhaps I'll have to setup a live Stamp-Cam! :-)


Wednesday, December 13, 2006

Have a Tree-Mendous Christmas!


Ok...I know that's lame, but it is what this ridiculous dancing/singing tree we used to have always said...so I figured it would work!

Anyway, here is another Christmas card I made recently. I've been seeing so many beautiful samples with the Tree for all Seasons set lately, that I just had to play some more. And to think I almost left this set behind!

I used my Holiday Thyme paper along with Cranberry Crisp (almost gone - just a few scraps left!) and Handsome Hunter. Even though Hunter isn't in the holiday thyme color pallet, I think it work swell on this card!

I used my ticket corner punch again, because I just love making those notches for brads now! And I also used some gold ribbon from last year's Holiday Mini catalog. I stamped Merry Christmas from the All Year Cheer set (not sure if it's 1, 2, or 3) with Gold ink (can't emboss still!) and again I inked up the tree with Handsome Hunter, then using my Chocolate Chip marker I colored the trunk brown. I love how that looks, and it's so fast and easy! And before assembling, I sponged a little cranberry crisp along the edges of my designer paper, because "everything is better wtih sponging!"

Last night I was up stamping til midnight, adn I did a one-sheet wonder with my Bodacious Blossom set. Not Christmas-y this time, but not the color combo I had originally wanted to do with this set. I'll try to take pictures today during the sun-light hours (the few we get!) and post later on.

Enjoy!

Tuesday, December 12, 2006

Have a Bodacious Christmas!


Oh joy, oh joy...we got 2 holiday cards in the mail today!!! :-) I love to get mail!!!

I finally got around to mounting my Bodacious Bouquet stamp set, and I just love it! I've seen a few Christmas cards made with it on Splitcoast, and had to try my own. I basically CASEd this beautiful card by HoneyDipped with a few alterations, as usual!

I can't belive I'm already out of Cranberry Crisp CS, but I am (well, I have a few scraps left, but that's all) So I had to use Baroque Burgundy instead. I still wanted to use the stitched ribbon, so I had to use True Thyme for my other color, so it would all coordinate! Additionally I used whisper white CS, and the Warm Words stamp set for the greeting. Instead of stamping the background, I just loaded my Baroque Burgundy marker into my Handy-Dandy Color Spritzer Tool and splattered the background...I like it! Lastly, you can't really see in hte photo, but I did add some Dazzlign Diamonds glitter t the center of the flower to give it a little glitz!

I hope you have enjoyed this! Now to get stampin' some more!!

Monday, December 11, 2006

Gingerbread Men are Watching You!


I've seen a few variations of this card on Splitcoast, and of course, since I do have Hung up on the Holidays, I HAD to make one!! It's such a fun card to make, I actually made 4! :-)

I changed it up a little from this card by olse0231 because I wanted to add some color. Also, I'm running out of Chocolate Chip (I had just over 1/2 a sheet left...can't even find any 12 by 12!!) so that also precipitated some of the changes. That said, here are the details:

I used Kraft CS for the base of the card, and then included Chocolate Chip, Whisper White and Real Red. I used Chocolate Chip, Close to Cocoa and Real Red ink. For punches we have the 1 1/4" circle punch, 1 3/8" square punch, corner rounder and ticket corner punches. For stamp sets it's just Hung up on the Holidays and Happy Everything (my other stamp set that I had been dying to use!!) and then I added a little red gingham and some gold brads to dress it up a little. All in all, a pretty fun card...and hopefully it will be as fun to receive as it was to make!

More Christmas cards tomorow!
-Jana

Saturday, December 09, 2006

Christmas Cards!

So, I've been trying to make lots of Christmas Cards, but unlike years past, I've been making lots of different designs. I'm not sending handmade Christmas Cards to everyone on my list this year since I did just do the "We're Moving" postcard not long ago. I'll send out a photocard with Julia this year as always, but will probably rely on Shutterfly or the like for that. So, just what am I going to do with all these Christmas cards that I"m making just for fun? Why, send them out of course! So...anyone who sends ME a Christmas card all the way to Germany will get one in return. Extra points for a hand-made card - I'll include a little extra with yours back! Now, I will be gone for almost 3 weeks right over Christmas, so any that arrive while I'm gone will have to wait until my return...sorry!

In addition...I'm going to start doing weekly drawings from the comments I recieve. So...if you'd like a RAK or other hand stamped goodie sent your way, be sure to post a comment while you're here browsing.

Now, on to today's card. This time I combined this week's sketch challenge with a card that I've been dying to CASE created by my online stamping buddy (and creative genius extraordinaire) Kyla! (You can see her blog here!) So...I used my brand new Festive Favorites stamp set - Thanks mom - and totally cased Kyla's idea of stamping the trees in the background, and then popping up the snowmen in the front. SO CUTE!!!

So, this card used the True Thyme, Cranberry Crisp, Whisper White and Sahara Sand cardstock. Basic Black, Cranberry Crisp, True Thyme, Marigold Morning, Sahara Sand, and Buckaroo Blue ink. I also used my aquapainter for the watercoloring. I used Print Pattern and Linen background stamps, and the beautiful Cranberry Crisp and True Thyme stitched ribbons.

The Sketch challenge was for a tri-fold pocket card, so I've also included a photo of the card open so you can see the inside. Sorry the photo is so bad...for some reason my camera really didn't want to focus properly! So on the interior card, I used the Ticket Corner punch and lightly sponged Cranberry Crisp ink around the edges. I stamped the Happy Holidays Rivet directly on the cardstock in True Thyme, did the donut shading using Cranberry Crisp stamped off once, and then used the 1/2" circle punch to punch out one of the snowmen to pop up in the center. Again, thanks for the creative ideas Kyla!!

I hope you all enjoy this card! I know I do. I like it so much, I'm not sure I'll be able to send it away!!! But ,we'll see...maybe some lucky reader out there will get it!

Have a great day...more Christmas cards tomorow!

Friday, December 08, 2006

Bring on the Challenge!


SplitCoast Challenges are always fun. I've been trying to do more of them (altho I rarely seem to upload them to SCS! Bad Jana!!) I'm going to try to committ to do at least 2 challenges per week...perhaps that will be one of my new year's resolutions since I'm leaving for the states in 2 weeks I won't have much time to get to them all before I leave!

This time, I used Card Sketch Challenge 98 from a few weeks ago. I also cased this beautiful card by cork1035 for the focal image. It didn't turn out quite as good as I had hoped, but overall I was happy with it! Once I have a heat gun I"ll be able to emboss all these wonderful things..for now I have to be happy with my 2-way glue pen and some Dazzilng Diamonds! The other day when DD went downstairs after a crafting session in our "shared craft room" (she has a small table near mine where she paints and does other crafts) my DH was appaled at all the glitter on her! Oh well...girls have gotta have some sparkle, right?

So, this card used Garden Green and Very Vanilla. I'm not super happy with Garden Green at the present momment...and may have been happier with a different color. Oh well. I inked the stamp up in Garden Green, then using my Choc. Chip marker, I colored in the trunk and a few branches to add some brown. Love that technique...that way you don't have to use markers for the whole thing...much faster! I added the gold brads to dress it up a little, and when it's closed, there is some narrow organdy ribbon to hold it closed. Stamped the inside with canvas before adding the "peace" greeting.

My favorites on SCS is getting quite large. I think I need to limit myself to 5 new additions per day, and for every 5 additions, I have to design at least 1 new card myself (or CASE as the case most often is for me!)

Ok...have a great day everyone...I'm going to STAMP! :-)

Thursday, December 07, 2006

Thanksgiving - a little late!

I had a Traditional American Thanksgiving dinner here in Germany, 1 day late. We decided Friday would be easier for our guests so they didn't have to worry about getting the kids ready for school the next day, or to work themselves. So along with the full turkey dinner and all the trimmings, I decided to make little Turkey placecards. There had been so many adorable turkeys done on Splitcoast using various punches, I of course had to try my own! They are SUPER easy to make, and lots of fun!

I used the coluzzle to cut out the body from Cranberry Crisp, the 1 1/4" circle punch for the heads from True Thyme, and the large oval punch to cut out the tail feathers from the Holiday Thyme designer paper. I sponged the edges of all pieces with the appropriate ink color, then put them all together, attached them to a 1/4 sheet of Kraft CS folded in half, and stamped names using the newsprint type alphabet from SU! Our guests loved them!

Enjoy!

Monday, December 04, 2006

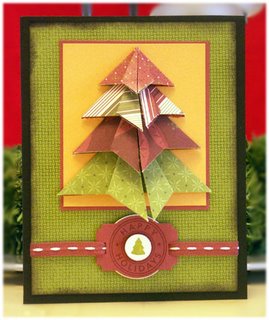
Origami Christmas Tree Card


Here's another CASE (Copy and Steal Everything.) I saw this beautiful origami tree card on Splitcoast (as usual!) and wanted to create my own. There are wonderful directions there, so I won't bother recreating them here. This was SOO easy to make...next I"ll have to make some not on a card to use as decorations for our tree over here!!

I used Basic Black, Old Olive, Marigold Morning and Cranbery Crisp CS, the SU! Holiday Thyme designer paper, black, old olive, & cranberry crisp inks, and the new Designer Label punch box and Aida cloth stamp sets, as well as the designer label punch, 1 1/4" and 1/2" circle punches. Oh yeah...and don't forget the wonderful Cranberry Crisp stitched ribbon...so glad they held that over for the rest of the catalog year!!!

Such a fun and easy card...I love it!

Sunday, December 03, 2006

Our Golden Bears

It was big game weekend in California, and our Golden Bears beat Stanford for the 5th straight year! We here are convinced that Julia has brought the good luck to Cal, and that coach Tedford is just lucky he started the year she was born! And while our golden bears will not be going to the Rose Bowl this year, again, they are still near our hearts at this season.

So...what better way to celebrate our win than with a Golden Bear Christmas Card! I had already decided I NEEDED to make one of the lovely new ornament cards (the first I saw was on Stamper's Showcase on the SU! Demo website created by Cathy Millen.) While I continued the ongoing process of organizing my stamping area, I noticed my new Pines stamp set (which I got for FREE, thank you very much) and I noticed how much the bear looks like the one used for Cal logo-wear. So...got out my ink...mounted the stamp...and voila! I used the pine twig from the Pines set to create the branch. Doesn't work quite as well as Peaceful Wishes, but I think it works well enough. I made the top of the ornament using some scrap rubber I had...and drew in the hook by hand with my Zig Painty Pen. And since I still don't have a heat gun over here, I couldn't emboss it to add some shimmer and shine, but I still think it's beautiful! And some lucky Cal fan will get this as their holiday card this year!

Colors are More Mustard, Night of Navy and Vanilla for the CS, Bordering Blue, More Mustard, Night of Navy and Going Grey and Always Artichoke for the ink. I then tied the bow using Navy Grosgrain and adhered it to the card with a glue dot.

I"ll be adding some more of my recent projects soon, so keep watching!

Happy Stamping!
-Jana