When I saw the new ball sport Pure Innocence stamp set for this last release I was ecstatic!! With a soccer player myself (who wants to try out Basketball too!) this set is perfect for me!!
Such a wonderful sketch this week too! I love all that open space to play in! Not too many layers - a sketch custom made for me. Kim must have remembered it was my birthday this week! :-) I used a few Die-namics here...grass, clouds and sun to be exact, and some great 3Bugs in a Rug paper I picked up at Memories Live On.
Happy tax day everyone, I'm off to Florida for a week, but I'll have a few posts here while I'm gone, so be sure to come check them out!
Showing posts with label mftwsc. Show all posts
Friday, April 15, 2011
Monday, April 11, 2011
MFTWSC14...Let's Chat!
I really love this new set and die, and was happy to finally get to play with it a little more. I wanted to play with this fun parisian paper that I picked up at my LSS (Memories Live On) a while back. And I thought it would be fun to use this set with this week's sketch!
I finished off the inside with another sentiment from this fabulous set. A fun card to send to a friend you haven't talked with in a long time!
Monday, April 04, 2011
MFT is lookin' Shabby!
So when I saw the MFT Guest DT contest for this month was Shabby Chic. Now, I'm not really one for shabby chic, but I though I would try and play along. I definately got the shabby part, just not so sure about the chic!!
I had started coloring this Fred the Bear image on Friday night, and so I thought I'd stick with him. Then, I pulled out an old pair of jeans I had been saving to use for cards and ran them through my Cuttlebug with my rolled rose and mini rolled rose die-namics. I used this week's sketch for my layout, and distressed all the edges with my scissors (I can't find my distressing tool...it's somewhere on my desk but I have no idea where with the giant piles I currently have!)
I added a little of the new MFT Baker's twine, and took a happy birthday sentiment from another Pure Innocence set I had on my desk and voila...a shabby (chic?) card!
I had started coloring this Fred the Bear image on Friday night, and so I thought I'd stick with him. Then, I pulled out an old pair of jeans I had been saving to use for cards and ran them through my Cuttlebug with my rolled rose and mini rolled rose die-namics. I used this week's sketch for my layout, and distressed all the edges with my scissors (I can't find my distressing tool...it's somewhere on my desk but I have no idea where with the giant piles I currently have!)
I added a little of the new MFT Baker's twine, and took a happy birthday sentiment from another Pure Innocence set I had on my desk and voila...a shabby (chic?) card!
Wednesday, March 30, 2011
MFT Catch up...
I haven't posted several of my recent MFT weekly sketch cards, so I'll try to get them all up here eventually!! For today i thought I'd show the most recent one I made for MFTWSC12 using the a la mode Go Team set.
Last soccer season the team mom we had was fabulous (this season hasn't really gotten going yet, but I'm sure this season's will be wonderful too!) but Kristen was such an amazing cheerleader for the girls...I loved having her at the games! So this card is for her!
Notice my attempt at making a shadow on the grass for her?? Have a great day everyone!!
Last soccer season the team mom we had was fabulous (this season hasn't really gotten going yet, but I'm sure this season's will be wonderful too!) but Kristen was such an amazing cheerleader for the girls...I loved having her at the games! So this card is for her!
Notice my attempt at making a shadow on the grass for her?? Have a great day everyone!!
Tuesday, March 15, 2011
MFTWSC10 - Something's Fishy...
This week's MFT sketch was another great one, and I was so happy to finally ink up my Something's Fishy a la Mode stamp. since I've been fishing with my dad since I was 5 years old, I LOVE the girls fishing stamps!! (remember this old Bella??)
I paired her up with some DeLovely papers...I just love this yellow, pink and green combo...who'd a thunk it? Of course I had to do a little paper piecing, for her top. The rest is all colored with my copics. and don't you just love this saying?? I think when combined with the "Something's fishy" sentiment it's the perfect card for that woman you suspect is pregnant (or probably best if it's confirmed!) LOL!!
And for the inside? I used the AMAZING new doily die (can't remember the name, and of course it's out of stock so I can't even look it up! Dizzy Doily?? Oh, and we do have it over at MLO if you're wanting it!!) I just love that new die...and am busy working it into a card for my April card class.
Speaking of card classes...did you notice my new Page up there? I know have a page dedicated to my classes where I'll post the photos of the projects, along with the dates of upcoming classes for quick and easy reference! :-)
I paired her up with some DeLovely papers...I just love this yellow, pink and green combo...who'd a thunk it? Of course I had to do a little paper piecing, for her top. The rest is all colored with my copics. and don't you just love this saying?? I think when combined with the "Something's fishy" sentiment it's the perfect card for that woman you suspect is pregnant (or probably best if it's confirmed!) LOL!!
And for the inside? I used the AMAZING new doily die (can't remember the name, and of course it's out of stock so I can't even look it up! Dizzy Doily?? Oh, and we do have it over at MLO if you're wanting it!!) I just love that new die...and am busy working it into a card for my April card class.
Speaking of card classes...did you notice my new Page up there? I know have a page dedicated to my classes where I'll post the photos of the projects, along with the dates of upcoming classes for quick and easy reference! :-)
Monday, March 07, 2011
I'm not just certifiable...
I'm Certified!! Yup, I took the Copic certification class with Jennie Black out in Sacramento yesterday. I got to carpool with the wonderful Eva, and met lots of uber talented ladies at what my husband termed the "muggle marker" class. (since I said they are NOT magic markers, he decided they must be muggles then!)
I learned some great techniques, and am now totally craving the air compressor for my airbrush system, as well as about 100 more markers (I currently have 112 - I counted!) Guess I better start saving some dough.
Arlene of Butterfly Kisses sat with Eva and I, and she was joined by two more friends, so it was like a big ole party. Fun times for sure. I actually got a little coloring done during some of the time Jennie was talking (seriously, she TOLD us to color then!!) and finally colored up one of my sweet little PI's in black and white. You all know I love this technique for my La-La Land stamps, but hadn't yet tried it with my MFT cuties. I used W00, 1, 3, 5, 7 and a touch of 9. What do you think??
I paired her with this fabulous Circa 1934 paper from Cosmo Cricket and this past week's MFT Weekly Stamp Club sketch. Can you see the little pop of red on her hearts?? That's with a spica pen - LOVE those!!
Hope you all have a great day, and be sure to come back tomorrow as I've got something planned! :-)
I learned some great techniques, and am now totally craving the air compressor for my airbrush system, as well as about 100 more markers (I currently have 112 - I counted!) Guess I better start saving some dough.
Arlene of Butterfly Kisses sat with Eva and I, and she was joined by two more friends, so it was like a big ole party. Fun times for sure. I actually got a little coloring done during some of the time Jennie was talking (seriously, she TOLD us to color then!!) and finally colored up one of my sweet little PI's in black and white. You all know I love this technique for my La-La Land stamps, but hadn't yet tried it with my MFT cuties. I used W00, 1, 3, 5, 7 and a touch of 9. What do you think??
I paired her with this fabulous Circa 1934 paper from Cosmo Cricket and this past week's MFT Weekly Stamp Club sketch. Can you see the little pop of red on her hearts?? That's with a spica pen - LOVE those!!
Hope you all have a great day, and be sure to come back tomorrow as I've got something planned! :-)
Monday, February 28, 2011
MFT Guest DT contest card...
This month's Guest DT contest for MFT was to create some DIMENSION using DIE-NAMICS. Now, I may not have ALL of them yet, but I certainly have more than a fair share of these dies, and I LOVE them!! So this was no hardship! And I got a chance to play with my Pixie-Licious paper which I love!
I started out with in idea to make a St. Patty's Day card (since I love that Irish holiday for giving me the excuse to make Corned Beef and Cabbage every year!) I used the Hearts a Plenty Die to create this adorable felt shamrock - isn't it sweet??
I colored up this cute little PI from last month's release to be holding the shamrock, and placed her on the layered labels dies. Notice I managed to use this week's sketch also?? I'm sneaky that way! Oh...and I love these little teeny tiny pearls from SU! for all my buttons lately - perfect size for her!
Of course I finished off the inside as well (although without any dimension) with more Layered Labels.
Sunday, February 20, 2011
March class sneak peek!
I've been busy designing cards for my March class at Memories Live On with the newest MFT stamps, and I hope you'll love them as much as I do!! I'm using a few of the new 3 Bugs in a Rug lines of designer paper for all 3 cards next month, and I just LOVE this new paper - such wonderful colors! Makes me feel like spring, even if it is raining!
This first card uses the MFTWSC7 sketch. This is another fabulous sketch...and so much fun with the new little Butterfly Kisses PI combined with the butterfly die-namic. Adorable, no??
For the Paper Piecing Challenge in the Moxie Fab World (and just because I love to paper piece!) I used some vellum cardstock to piece her wings, and then added some fabulous Martha Stewart purple sapphire glitter to glam them up a bit. Her leotard is pieced with the 3 bugs paper from the background. I'm really liking the purple and green combo here....might have to do that again! And did you check out those gorgeous green rhinestones? They are by Memory Box...and they are gorgeous!!! And with all these dies it's perfect for the Crazy 4 Challenges challenge this week to use dies. :-)
I finished off the inside with the reverse side of the purple paper along with the simply scallops dienamic. have a wonderful President's Day everyone...and I'll be back with more soon! If you want to sign up for the class, call Memories Live On at (408) 446-9901.
This first card uses the MFTWSC7 sketch. This is another fabulous sketch...and so much fun with the new little Butterfly Kisses PI combined with the butterfly die-namic. Adorable, no??
For the Paper Piecing Challenge in the Moxie Fab World (and just because I love to paper piece!) I used some vellum cardstock to piece her wings, and then added some fabulous Martha Stewart purple sapphire glitter to glam them up a bit. Her leotard is pieced with the 3 bugs paper from the background. I'm really liking the purple and green combo here....might have to do that again! And did you check out those gorgeous green rhinestones? They are by Memory Box...and they are gorgeous!!! And with all these dies it's perfect for the Crazy 4 Challenges challenge this week to use dies. :-)
I finished off the inside with the reverse side of the purple paper along with the simply scallops dienamic. have a wonderful President's Day everyone...and I'll be back with more soon! If you want to sign up for the class, call Memories Live On at (408) 446-9901.
Monday, February 14, 2011
Happy Valentine's Day!
Here's my card for this week's MFT sketch. I had a lot of fun putting this card together with my new stamps, the fun Champagne sipping a la Mode and the fabulous new Twisted Sentiments four. I have all but one of these sets, and I love them all! Anyone know where I can get the 2nd one??
The sketch this week was certainly a challenge...and I did take a few liberties with the overall sketch, but stayed fairly true to the original I think! The paper is from Pink Paislee - isn't it gorgeous??
I used some SU! rhinestones for my little accents...and of course colored her in with my copics. I was going for the Katherine Hepburn look with the auburn hair. Loving my new E08 and E09 markers!!
As usual, I finished off the inside too with one of the sentiments from the A La Mode set. So much fun! Have a wonderful day everyone!
The sketch this week was certainly a challenge...and I did take a few liberties with the overall sketch, but stayed fairly true to the original I think! The paper is from Pink Paislee - isn't it gorgeous??
I used some SU! rhinestones for my little accents...and of course colored her in with my copics. I was going for the Katherine Hepburn look with the auburn hair. Loving my new E08 and E09 markers!!
As usual, I finished off the inside too with one of the sentiments from the A La Mode set. So much fun! Have a wonderful day everyone!
Sunday, February 06, 2011
MFT WSC5
Happy Sunday everyone. We've got another gorgeous California day here today. I could get used to this weather again...but I know soon enough it will start raining and get chilly again. At least it isn't snow!!
I got a chance to play along with the MFT stamp club challenge, and this week's sketch was fabulous!! I finally got my new little Ladybug PI inky too - which was loads of fun! Isn't she adorable? I think the perfect Valentine for my Julia bug!
I actually mixed patterened papers...I have some Cosmo Cricket Garden variety along with the houndstooth from Pink Paislee's Bayberry Cottage. I can't wait to paper piece with that one, it's such a nice small pattern! I colored her in wtih my copic markers, and then used a silver spica pen for her wings. I sponged the edges of her oval layer with some creamy caramel ink. The little I Love You sentiment is from another PI set, I just can't remember which!
I finished off the inside with a sentiment from the ladybug set along with some more dp...I know my little bug will love it!! I'll be back tomorrow with another sample for my February class...don't forget to sign up if you're in the area!
I got a chance to play along with the MFT stamp club challenge, and this week's sketch was fabulous!! I finally got my new little Ladybug PI inky too - which was loads of fun! Isn't she adorable? I think the perfect Valentine for my Julia bug!
I actually mixed patterened papers...I have some Cosmo Cricket Garden variety along with the houndstooth from Pink Paislee's Bayberry Cottage. I can't wait to paper piece with that one, it's such a nice small pattern! I colored her in wtih my copic markers, and then used a silver spica pen for her wings. I sponged the edges of her oval layer with some creamy caramel ink. The little I Love You sentiment is from another PI set, I just can't remember which!
I finished off the inside with a sentiment from the ladybug set along with some more dp...I know my little bug will love it!! I'll be back tomorrow with another sample for my February class...don't forget to sign up if you're in the area!
Monday, January 31, 2011
Peek A Boo times 2!
Ok...I got a card made for the MFT Guest DT contest as well...and I'm quite happy with it! What do you think?
I made it for this week's sketch, and was pretty happy with it. Then I realized, hey...this has 2 colors of cs, one patterned paper, and 2 embellishments...I could add another embelly and it would work for the Guest DT challenge as well. Then I thought, I'll remake it...and step it up a little. This is where I started!
I added some paper piercing and stitching, for the image itself I added grass for her to stand on, and made the sky a little more splotchy (LOVE my new copic air brush system - thanks honey!!!) to simulate some clouds. I also added some blades of grass with my pencils. Her flower was colored with spica glitter pens to add some sparkle, and I made the shadows on her skin a little more intense so you can really see them.
My three embellishments are ribbon, buttons, and linen thread. I'm quite happy with the "upgrades" this card got, and I hope you enjoy it as well! Oh..and the inside is pretty cute too - I'm thinking I should send it to my niece, but will also have to make something for my nephew then...hmmmm!
I made it for this week's sketch, and was pretty happy with it. Then I realized, hey...this has 2 colors of cs, one patterned paper, and 2 embellishments...I could add another embelly and it would work for the Guest DT challenge as well. Then I thought, I'll remake it...and step it up a little. This is where I started!
I added some paper piercing and stitching, for the image itself I added grass for her to stand on, and made the sky a little more splotchy (LOVE my new copic air brush system - thanks honey!!!) to simulate some clouds. I also added some blades of grass with my pencils. Her flower was colored with spica glitter pens to add some sparkle, and I made the shadows on her skin a little more intense so you can really see them.
My three embellishments are ribbon, buttons, and linen thread. I'm quite happy with the "upgrades" this card got, and I hope you enjoy it as well! Oh..and the inside is pretty cute too - I'm thinking I should send it to my niece, but will also have to make something for my nephew then...hmmmm!
Friday, January 28, 2011
Glimmer spray and MFTWSC3
This week's sketch for MFT's Wednesday Stamp Club is wonderful in its simplicity! I'm a C&S girl at heart, so when I see a sketch with minimal layers like that my heart sings! (I've already made 2 cards with it...and will try to sneak in at least one more this weekend!)
There was also a challenge on the CARDS Create blog to use spray mist on a card, so it was a good excuse to pull out the Tattered Angels gold mist I bought at the CHA supershow LAST year and finally use it! I used an old cuddlebug folder for the bottom layer, then sprayed away with my gold mist. Next, I cut out the heats with my nesties, and then stamped the sentiment from Clearly Sentimental About Love on my vanilla heart. I sponged some Creamy Caramel ink on, the assembled everything (adding an antique brad to my layered bow)
I think, even with that big bow on there, this card could be used for a man...what do you all think??
There was also a challenge on the CARDS Create blog to use spray mist on a card, so it was a good excuse to pull out the Tattered Angels gold mist I bought at the CHA supershow LAST year and finally use it! I used an old cuddlebug folder for the bottom layer, then sprayed away with my gold mist. Next, I cut out the heats with my nesties, and then stamped the sentiment from Clearly Sentimental About Love on my vanilla heart. I sponged some Creamy Caramel ink on, the assembled everything (adding an antique brad to my layered bow)
I think, even with that big bow on there, this card could be used for a man...what do you all think??
Tuesday, January 25, 2011
Playing with MFT Sketches
I finally got a chance to play along with this week's MFT Weekly Sketch Challenge yesterday, but didn't get to take the photo until this afternoon...so here you go! My VIP kit arrived yesterday, and I was so excited to get to play with it (of course, I should have been cleaning the house - oh well!) I knew I wanted to make a card for my Julia Bug...just a little something to slip to her sometime to let her know I love her.
I love this new MME 6 by 6 paper pack - such fun bright colors!! It was fun deciding which patterns to use for the outfits...and then matching to my SU! papers. Of course for my piecing I used all I learned from Joanne and pieced in layers, edging everything with dark grey (that way it doesn't look as bad as black would if I mess up a little!) I added a heart (from the hearts a plenty Die-Namic!) and a button with some MS bakers twine, along with a slightly re-oriented sentiment flag from the sketch.
I finished off the inside with another of the fabulous sentiments from this set and some more dienamics. I remember reading this book to Julia when she was little and always getting choked up (especially at the end when the little boy, now grown, comes back to rock his mother!) I hope she likes her card!
I love this new MME 6 by 6 paper pack - such fun bright colors!! It was fun deciding which patterns to use for the outfits...and then matching to my SU! papers. Of course for my piecing I used all I learned from Joanne and pieced in layers, edging everything with dark grey (that way it doesn't look as bad as black would if I mess up a little!) I added a heart (from the hearts a plenty Die-Namic!) and a button with some MS bakers twine, along with a slightly re-oriented sentiment flag from the sketch.
I finished off the inside with another of the fabulous sentiments from this set and some more dienamics. I remember reading this book to Julia when she was little and always getting choked up (especially at the end when the little boy, now grown, comes back to rock his mother!) I hope she likes her card!
Monday, January 10, 2011
MFT WSC is All Sketches, baby!
Did you hear that MFT has changed their Wednesday stamp club to ALL SKETCHES??? I was so excited about this. Not that I don't like other challenges, but I LOVE sketches!! And with all the fabulous MFT stamps, there's an unlimited amount of stamping fun to be had.
I really wanted to try out this new set (ok, I've had it for a while, just hadn't used it yet!!) Flower Silhouette. I die cut the flower from Baja Breeze cs, then stamped the outline image on top with the same color. I added a little shading to the flower then added some glitzy glitter to the center.
I wanted to use my brand spankin' new Layered Label Die for the oval centerpiece on the card...it's so awesome! (and sorry...looks like Kim's sold out right now!) I used some fun SU! dsp, and the faux crochet trim die-namics along with some pearls for the ruffles at the top.
I finished off the inside very simply with another strip of dsp and another sentiment from this beautiful set!
I really wanted to try out this new set (ok, I've had it for a while, just hadn't used it yet!!) Flower Silhouette. I die cut the flower from Baja Breeze cs, then stamped the outline image on top with the same color. I added a little shading to the flower then added some glitzy glitter to the center.
I wanted to use my brand spankin' new Layered Label Die for the oval centerpiece on the card...it's so awesome! (and sorry...looks like Kim's sold out right now!) I used some fun SU! dsp, and the faux crochet trim die-namics along with some pearls for the ruffles at the top.
I finished off the inside very simply with another strip of dsp and another sentiment from this beautiful set!
Tuesday, December 21, 2010
MFT WSC - Christmas PI's
Good morning everyone! I have my MFT WSC challenge card for you today, a Christmas card featuring the wonderful Pure Innocence line. I chose Wyatt Just Chillin'. I had another tag ready to add an image to, and thought I could use that to make a card. It was pretty fast and easy once I colored Wyatt in and cut him out.
I went very simple, added a button and sentiment flag to the tag, and a big fat bow to the card. This one has already been mailed to my younger cousin from my folks. WOOHOO!! Have a great day!
Tuesday, November 30, 2010
MFT stitching it up!
This month's Guest Designer Contest for MFT is to Stitch it Up. I'm not so handy with my sewing machine latelly, but I can still stitch by hand pretty well. I actually had another idea for this challenge, but NO TIME to complete it unfortunately, however I still like this one!!
I used my Lil' Pumpkin PI girl and decided to quilt her pumpkin.So, I first stamped it on some dp, then turned it over on top of a few layers of felt and using my dry embossing stylus, stretched the paper a bit. Then, I added some dimensionals under the pumpkin to adhere it down (after coloring her and paper piecing her dress). Lastly, I paper pierced along the lines of the pumpkin and back-stitched with some brown floss. I layered her on a nestied really rust scalloped rectangle, then worked on finishing up the card base.
I hand stitched the retired SU! dsp to some soft sage cardstock using more brown floss, then added the more mustard strip with some chocolate chip ruffled ribbon on top. I cut out the half circle pieces with my rounded banner trio die-namics die, then stamped the sentiment one word at a time to fit. And hey..this qualifies for the wednesday stamp club too...how bout that?? ;-)
I used my Lil' Pumpkin PI girl and decided to quilt her pumpkin.So, I first stamped it on some dp, then turned it over on top of a few layers of felt and using my dry embossing stylus, stretched the paper a bit. Then, I added some dimensionals under the pumpkin to adhere it down (after coloring her and paper piecing her dress). Lastly, I paper pierced along the lines of the pumpkin and back-stitched with some brown floss. I layered her on a nestied really rust scalloped rectangle, then worked on finishing up the card base.
I hand stitched the retired SU! dsp to some soft sage cardstock using more brown floss, then added the more mustard strip with some chocolate chip ruffled ribbon on top. I cut out the half circle pieces with my rounded banner trio die-namics die, then stamped the sentiment one word at a time to fit. And hey..this qualifies for the wednesday stamp club too...how bout that?? ;-)
Monday, November 22, 2010
MFT WSC
I got to play along again this week with the My Favorite Things Wednesday Stamp Club. This week, we were to derive inspiration from the song My Favorite Things from the Sound of Music. In our household, that is a favorite family movie. In fact, it's one of the few movies Julia is comfortable watching because there are almost no scary parts (especially if the movie stops at the wedding scene!!) So needless to say, I know the song well!
I decided to go for Silver White Winters and use my brand new Inspired By - Winter stamp set. I stamped the cabin, then masked it to stamp the trees. I then cut some rolling hills to mask, then stamped and embossed the moon and stars. I brayered on the night sky, then removed my mask and colored the cabin with my copics. I stamped the sentiment, then added some sparkle to the edges of "hills" and along the roof lines with my quickie glue pen and some Glitzy Glitter.
I finished off the inside with some more trees , but left plenty of room to write a nice note. This is such a great generic card, you cold use it for almost anything! Have a great day everyone...we're off to visit Santa! :-)
I decided to go for Silver White Winters and use my brand new Inspired By - Winter stamp set. I stamped the cabin, then masked it to stamp the trees. I then cut some rolling hills to mask, then stamped and embossed the moon and stars. I brayered on the night sky, then removed my mask and colored the cabin with my copics. I stamped the sentiment, then added some sparkle to the edges of "hills" and along the roof lines with my quickie glue pen and some Glitzy Glitter.
I finished off the inside with some more trees , but left plenty of room to write a nice note. This is such a great generic card, you cold use it for almost anything! Have a great day everyone...we're off to visit Santa! :-)
Saturday, November 06, 2010
RAWR - Happy Birthday!
This week I got a chance to play along with the MFT Wednesday stamp club...and since it's the first Wednesday of the month it's a sketch, this month from Frances! Imagine that, 2 great sketches from Frances in one week!! :-)
I wanted to make a cute birthday card for the young son of a very good friend of mine, so I pulled out my as yet uninked Little Loveasaurus and got busy. I colored him with my copics, then used the colorless blender to create a little extra texture. For my designer paper I used my All About Boys mat stack from DCWV
I cut out the small cloud with my die-namics cloud die and stamped the RAWR on it...then stamped Happy Birthday on a strip of paper and trimmed the ends to make a banner. A nice simple card, but oh so fun to make!
I wanted to make a cute birthday card for the young son of a very good friend of mine, so I pulled out my as yet uninked Little Loveasaurus and got busy. I colored him with my copics, then used the colorless blender to create a little extra texture. For my designer paper I used my All About Boys mat stack from DCWV
I cut out the small cloud with my die-namics cloud die and stamped the RAWR on it...then stamped Happy Birthday on a strip of paper and trimmed the ends to make a banner. A nice simple card, but oh so fun to make!
Tuesday, October 26, 2010
MFT WSC Gift item...
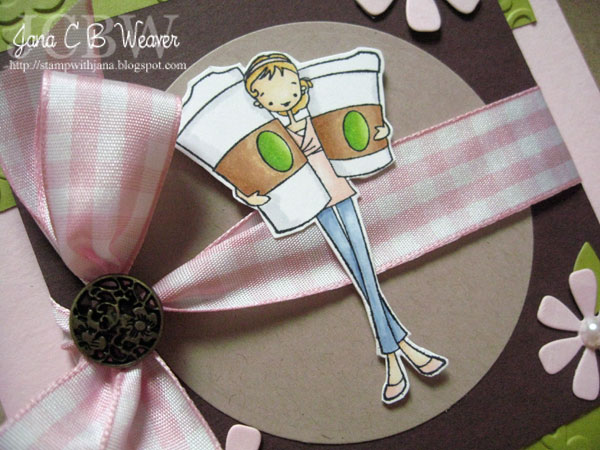
Good morning everyone, I hope you all are off to a good start! I finally got a chance to play along with the My Favorite Things Wednesday Stamp Club challenge to make a gift bag or other packaging. I thought, I should make a gift bag for my coffee sleeve and matching card that was on Kim's blog here. So, off to work I went with my caffeine lovin' a la mode!!
I used Allison's sketch for LPS from this week to design the panel for my bag. I used the same colors as the original set (pink pirouette, kraft, chocolate chip and Pear pizzazz) Such a fun sketch to work with, and such a fun project! Thanks for all the fun challenges everyone!!
Tuesday, October 19, 2010
MFT Wednesday stamp Club...for the Boys!I
I finally got it done - just under the wire too! As soon as I saw the Wednesday stamp club challenge this week I knew what I wanted to do. I think I'll have to send this card to my brother since it's something we used to indulge in constantly growing up!
Don't these two Pure Innocence characters look adorable? They just belong together...and she's being a little mischievous today. I stamped them on a perfect panel, and colored them with my copics. Then I freehand cut the tree from some chocolate chip CS. I swiped a white craft inkpad onto the tree, then sponged some chocolate chip ink onto the other side to give it some shadow and dimension. Lastly, I added some polar white flower soft to make the snowy ground
I used some Basic Grey paper for the background, and added a die-namics cut snowflake on top of a Heidi Swapp ghost snowflake, with a glittery brad in the center, then I added the sentiment from the Candy Cane Kisses a la mode set.
I of course finished off the inside as well...and you can see she made her decision and let the snowball fly. For the inside, I used a sentiment and snowflakes from the mini set which came with last month's VIP kit.
Don't these two Pure Innocence characters look adorable? They just belong together...and she's being a little mischievous today. I stamped them on a perfect panel, and colored them with my copics. Then I freehand cut the tree from some chocolate chip CS. I swiped a white craft inkpad onto the tree, then sponged some chocolate chip ink onto the other side to give it some shadow and dimension. Lastly, I added some polar white flower soft to make the snowy ground
I used some Basic Grey paper for the background, and added a die-namics cut snowflake on top of a Heidi Swapp ghost snowflake, with a glittery brad in the center, then I added the sentiment from the Candy Cane Kisses a la mode set.
I of course finished off the inside as well...and you can see she made her decision and let the snowball fly. For the inside, I used a sentiment and snowflakes from the mini set which came with last month's VIP kit.
Subscribe to:
Posts (Atom)