Showing posts with label pure innocence. Show all posts

Thursday, January 13, 2011

3rd card for Sunday's class...

Sunday's class is almost full. I think we have space for one or 2 more people, so if you'd like to come, call Memories Live on at (408) 446-9901 right now to sign up!!


This third card uses the adorable Box of Love Pure Innocence set. What a great card for Valaentine's Day, right? This great designer paper is from a fun serries of Black and White designs (I can't remember by whom!) and isn't this pleated red satin trim just dreamy???


I stamped her 3 times, once on my nestability cut rectangle, once on the polka dot dp, and once on some scraps (just her middle.) I then colored my little girl with copics, and the box of chocolates on the scrap piece. I added a little shading to her dress. Then, i cut out the box of chocolates (with her hands!) and the dress, and assembled it all. Lastly, I used some clear glaze pen on the chocolates and her shoes to give them a little shine. I cut out the rolled flower from some red CS, rolled it up and then put some clue on the top to dip in some chunky cut glass glitzy glitter.

For the inside, I stamped the box top on the bottom of the paper (notice I omitted it for the main image on front) and colored it in. I assembled everything, stamped the sentiment, and I was done! So, if you're local to the Bay Area, I'd love to see you there on Sunday!!

Sunday, January 09, 2011

Another sample from my upcoming class...

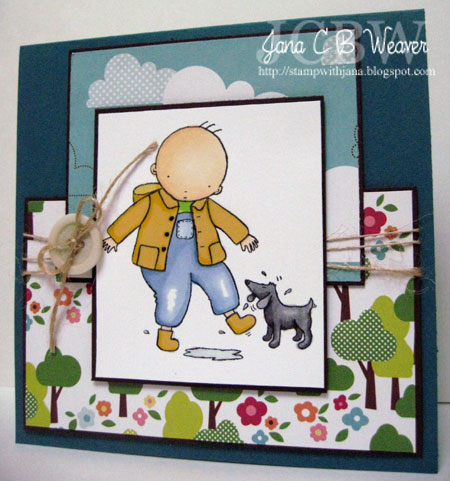
You all know how much I love the Pure Innocence line of stamps from MFT, and in the last 2 years I've come to appreciate the little boy stamps even more, so I truly love this little guy jumping in puddles!! It reminds me of my nephew when we were back in Maine 2 summers ago!


For this, the second card we'll be making at my upcoming class, I used some super fun American Crafts City Park paper. I even pieced his jacket and boots with some solid paper (it doesn't have to be patterned paper when you're piecing an image!!) and then covered them with diamond glaze so they look like old fashioned rain gear.


The layout for this came from my sketchbook, and was actually an MFT Wednesday stamp Club sketch many moons ago (Thanks Frances or Cindy - can't remember who did this one!) I keep all my sketches in a little sketch book (or 3!) so that I can just flip through when I need some inspiration.


As usual, I finished off the inside too. Isn't this sentiment the best?? To sign up for the class (Next Sunday, January 16th at 2pm) call the folks over at Memories Live On in Cupertino (408)446-9901. But you better hurry...space is filling up fast! Oh...and if you're in the neighborhood, I'll be there at MLO on Tuesday over the lunch rush doing a FREE sweet little Valentine make and take with another adorable Pure Innocence stamp! So come on over and say hi.

Tuesday, November 30, 2010

One more stitching...

 Ok...so even though I've been (mostly) awake since 3:30 this morning (thanks Jack!) I did manage to get another project done (Jack has slept less than 2 hours of that time!!) Remember back in October when I was Kim's Fab Friend and I made the coffee cup sleeve? Well, some friends saw it and wanted one...so I had to make more.

 For this one, I used this fabulous turquoise felt from MFT, and I cut one end using the Perfect Bracket Edge Die-Namic die, then backstitched the 2 ends together with grey embroidery floss. I cut several snowflakes from some white felt using the Let it Snowflake dienamic and adhered them to the felt. Then, I stitched some buttons into the snowflakes.
Next, I made a matching tag. I used some label nesties to cut out my taken with Teal base, then a smaller one to cut out the fun dp that's layered on top. I colored and cut out Flurry of Love PI girl and adhered her to the tag. I wanted to add some stitching to the tag also, but didn't have the patience for more hand stitching, so I faux stitched all around the outside by piercing then adding the lines with a silver Spica pen. Lastly, I added one more felt snowflake to teh top of the tag using a snowflake brad which I also used to hold the ribbon on with, and added the sentiment. I know my friend will really like this!!

Tuesday, October 19, 2010

MFT Wednesday stamp Club...for the Boys!I

I finally got it done - just under the wire too! As soon as I saw the Wednesday stamp club challenge this week I knew what I wanted to do. I think I'll have to send this card to my brother since it's something we used to indulge in constantly growing up!
Don't these two Pure Innocence characters look adorable? They just belong together...and she's being a little mischievous today. I stamped them on a perfect panel, and colored them with my copics. Then I freehand cut the tree from some chocolate chip CS. I swiped a white craft inkpad onto the tree, then sponged some chocolate chip ink onto the other side to give it some shadow and dimension. Lastly, I added some polar white flower soft to make the snowy ground
I used some Basic Grey paper for the background, and added a die-namics cut snowflake on top of a Heidi Swapp ghost snowflake, with a glittery brad in the center, then I added the sentiment from the Candy Cane Kisses a la mode set.
I of course finished off the inside as well...and you can see she made her decision and let the snowball fly. For the inside, I used a sentiment and snowflakes from the mini set which came with last month's VIP kit.

Monday, May 10, 2010

MFT's SFYTT

This week, Kim from MFT is sponsoring Jen's Sketch for You to Try - so of COURSE I had to play along! I pulled out my brand new Beach Bum PI girl and my equally new Oasis paper from SU! and had some fun.
I colored this little sweetie with my copics (of course) and than paper pieced her suit. Her sand castle is stamped on the new cork sheets from MFT. I thought it would be fun to have her holding the flag from the castle and I pieced that with some only orange cs then drew in the line for the stick. I added some buttons at the bottom and some ribbon to finish it all off.
I finished off the inside as well with a little more dp, the sentiment, and our little cuties pail and shovel.
Have a great day!

Monday, March 15, 2010

Another MFT Cutie

Here's a card I made a few weeks back, just having fun. I like the clouds in this paper for rainy images because they seem less sunny than all white clouds. And the basic gray cs from SU! is perfect for a rainy day sidewalk.
 I paper pieced her umbrella and colored the rest of her to match. Then, I added the rain with some stickles.

For the inside, I used Start each Day with Whee...to indicate that the rain will go away and you'll soon be swinging in the sunshine!

Hope you all have a wonderful day, thanks for stopping by!

Saturday, March 13, 2010

Shamrocks galore!

There's no doubt...I LOVE St. Patty's day. Part of the reason is I LOVE Corned Beef and Cabbage - and that is the one day a year I can force my family to eat it! I also can claim some percentage of Irish blood (don't ask me to quantify it!) So of course I was thrilled with Jane suggested a Green challenge over on our I Dream of Stamping challenge blog for this week! That, and I had just gotten a new 4-Leaf Clover Girl from MFT's Pure Innocence line.
I used my wonderful Cosmo Cricket Garden Variety paper again to paper piece this little cutie, and for the background as well. I used some of SU!'s Not Quite Navy to layer everything, and the card base and shamrock are from PTI Spring Moss (as is the ribbon!) The layout was supposed to be this week's Mojo sketch, but it went off a little. Oh well!
I finished off the inside with similar papers and added the Go Green sentiment from SU! again, because I just LOVE it! Be sure to go check out the I Dream of Stamping blog to see Jane and Michelle's samples, and then make your own and join the fun!

Tuesday, March 09, 2010

MFT Sketch is Bloomin' Great!

Last week's Wednesday Stamp Challenge from MFT was a wonderful sketch created by my wonderful friend Frances! I just LOVE sketches!! I was able to create my card before leaving for wine country, but am just now getting around to uploading it. I'm glad I finished it though, because it made a perfect birthday card for Julia's 1st grade teacher yesterday!!
 I used the adorable little Pure Innocence Blooming Girl as my main image. I colored her with my copics (don't you love that orange dress? I know I do!) and cut her out with my circle nesties. She is mounted on a nestability peony shape cut from Pumpkin Pie cardstock. I used my new Cosmo Cricket Garden Variety mini stack for the 3 panels behind, layered on some Glorious Green cardstock, with some Green Galore as the layer on top of the Pumpkin Pie card base.
 I added some twill ribbon underneath this little cutie, and finished it off with my paper flower for Joanne's crumple it challenge. That was WAY fun to make, can't wait to make more! Oh..and I added the sentiment using my new Go Green stamp from SU! by inking each word individually and using the stamp-a-ma-jig to line everything up.
Finally, I finished off the inside with some more of this wonderful DP and the sentiment from the Pure Innocence set. I hope you have a blooming good day, and now I'm off to finish up a tutorial I'm working on for tomorrow's La-La Land Crafts challenge post...I hope you'll come back to see that and my Paper Pretties challenge cards tomorrow!

Saturday, February 20, 2010

challenges galore!

I don't usually do this, but somehow this card just turned out to work for many challenges! I started it as my sample for the I Dream of Stamping blog's curling challenge (which starts Sunday morning so be sure to check it out!) and then decided to use Julie Masses' inspiration challenge from the Stamping Around blog. Of course, since I used one of my new Pure Innocence girls I had to paper piece her outfit, thus qualifying for Joanne's challenge here, and finally I used the latest CPS sketch #154! Whew!!To start off, I stamped this new little sweetie with her cute pigtails on a cream Perfect Panel. I then stamped her on 2 different dp's from MME's Be Loved paper and a second time on the perfect panel (to cut out her arms per Joanne's great new paper piecing tut!) Then, I colored everything (including shading on the dp) and cut it all out to piece it together. Lastly, I cut her out with my new deckle edge oval nestability die.I followed the CPS154 sketch, sponging distress ink and sewing on each of the different layers. I created the satin roses using SU! vanilla satin ribbon and following the instructions from Debbie Olson's recent blog post. They do get easier the more you make...and I discovered 12" was too long, so I ended up using only 8 or 9 per rose. After assembling everything it was still missing something, so I added that strip of lace over to the right side. That helped tremendously in my mind!I finished off the inside with a little more stitched on dp, the sentiment and the flower which the little girl is watering stamped inside (minus the little girl, can, and water!) I hope you've enjoyed this card as much as I did making. Be sure to check the details for the curling challenge on I Dream of Stamping on Sunday morning - I can't wait to see what you all come up with for this one!

Friday, February 19, 2010

Ice, Ice Baby

Sorry...I couldn't help myself. When Julia was little we taught her to say that because it was sooo dang cute! For today's challenge over on the I Dream of Stamping blog you need to have some ice and/or snow on your card - in whatever format you want! I've been trying to keep up with the olympics (only 2 days behind right now) and just watched Lindsey Vonn win gold, and Louie Vito miss out on bronze, so I'm seeing plenty of snow and ice!For today's card, I used a digital image I purchased from Heather Ellis, the illustrator of the adorable new Pure Innocence line of stamps Kim has over at My Favorite Things (all of which are currently in stock last I heard!) Since I obviously don't have enough of these cuties (I have all but 2 I believe!) I had to go in search of more and found Heather's etsy site with her digital images. As a general rule, I don't care for digital images because I don't have a printer that works with my computer and can only print from dh's laptop. So, when I print, I tend to print a lot at once!!!I did very little coloring on this little cutie, just her hair & skin, some shading on the tub, a little shading for the bubbles, and the heart. I then cut her out with my circle nesties and covered the whole bit with versamark ink. I embossed it with SU's iridescent ice ep, then set her aside (under something heavy so the piece wouldn't curl!) I wanted to use Mercy's tuesday sketch which I really liked, but I had to change it up a little to work with this round image. I didn't want to use squares, and when I punched some circles it looked off. Michelle was here and we finally agreed flowers were the way to go for those side elements. These (and the brads) are some from GinaK from 2 years ago. I'm really happy with the final result!!Oh...and did you notice the stitching on there? My husband finally had some time to take a look at my sewing machine last weekend, he cleaned it out and oiled it, and it works FABULOUSLY now! I'm so excited, you'll start seeing a lot more sewing on my cards, since my machine will be sitting on my desk from now on! WOOHOO! I added some more dp to the inside of the card (this is from the SU! Sweet Pea designer pack) and a sentiment from the Serentiy Now MFT mini set.

Now...go work on your Icy challenge card and link it up over on the I Dream of Stamping blog. you could win a great new stamp set!!

Saturday, February 06, 2010

MFT Monday: More MFT Cuties!

Do you remember this post? We were challenged to create cards using the wonderful MFT line art images, but NOT COLOR them in. That was so hard to do...that I had to create the same cards, but colored this time!! Much more my style!! The first card uses Balloon Girl from the Pure Innocence line of stamps (sorry, she appears to be sold out right now!). I love these little cuties, and can't wait to get my newest ones - they might arrive today! I colored her with my copics, then added some crystal effects to her balloon. After I tied on the bow, I added that little flower instead of a button...just because! I also used the Birthday Girl sentiment that comes with this set - now it's all set to give away at yet another party Julia has next weekend!The second card uses the cute little "Boy and Dog, Snow Adorable(also sold out right now set. I didn't stamp the dog (again) but LOVE coloring in this little guy. I have to admit, I love these images so much I went and bought some of the artists digital images as well - I'll have some projects with those to show in the coming weeks I hope! I used the sentiment that came with this set, and added some ribbon and a snowflake embellishment to finish it off.I love these. They used super simple layouts, but were tons of fun to make! Now I'm hoping my new stamps arrive in time to use them for the WSC (Wednesday stamp club) sketch from Frances and Cindy this week - I won last week's challenge which was a good thing since I needed that extra $15 for the huge order I placed!!

Have a happy Monday, and thanks for stopping by!

Tuesday, January 26, 2010

MFT Monday a day late...

CHA was awesome! I had so much fun meeting all kinds of famous stampers like Beate Johns, Jenn Balcer, Carolyn King (Cammy) and others. I met up with some old friends (Jodi, Donna, Jackie P and Jackie R) It was just so amazing to meet in person these women I had communicated with online for so long! The stuff was cool, but for me it was all about the people.I finally got a chance to play along with last Wednesday's stamp club challenge from Kim at MFT (who I also got to see in Anahiem!) on Monday. This time it was all about texture!I finally inked up my Egg Girl PI stamp and stamped her on a cream Perfect Paper Panel (did you all read how much I love these things yesterday??? They ROCK!) and cut her out with my oval nesties. I colored her with copics and paper pieced her dress with some of this gorgeous Nook and Cranny paper from Basic Grey. I also used the Nook and Cranny paper for the various layers on the card, along with some chocolate chip cs.I added this gorgeous maya Road lace, and then stuck some tiny pearls into each bump of the scalloped layer, and then added the greeting and Voila - finished card! I LOVE this stamp, and you'll be sure to see several more with her soon. For now, I'll be back tomorrow with this week's Prettie wednesday card and challenge for you all! Have a happy Tuesday!

Monday, January 18, 2010

MFT Monday - No Coloring???

For Kim's MFT Wednesday Stamp Club last week, she challenged us all to make a birthday card with some wonderful MFT line art stamps, but then not color them in. What was she thinking? I just got a new set of Copic Ciao markers that I'm DYING to color with, and here she's telling me NOT to??? How cruel!Well..I figured why not play along - but I decided to make two versions of each card. One where I let the recipient color it in, and one where I get to color (which makes me much happier!) Of course, I haven't had time yet to color mine in, so here are the first 2.I used some new nana's kids paper from my fellow Prettie Girl Jackie for my little boy card, and for my little girl card the dp comes from a Christmas Glitter stack of DCWV paper. These cards were super fun to make, and I can't wait to use them at some upcoming birthday parties Julia has over the next few weeks. I know they'll love getting to color in their own cards!

Monday, December 28, 2009

MFT Pure Innocence

I have to admit, I fell in love when I first saw these adorable little girls, and since I finally bought them, I haven't been able to play with them NEARLY us much as I want to!!! However, when I saw the challenge for last month's Favorite Guest Designer contest I quickly designed a plan!My friend Michelle had recently received a luminary in a cool swap she does with one of our online stamping friends. I thought that would be a fun thing to make...so I stamped my little girl onto some vellum and colored her with my copics. the luminary itself was easy to make (this one used 2 pieces of cs, 3.75" by 5.25 inches. The luminary is 3.5 inches by about 5 inches tall (I punched off the top using a new edge punch!!)I colored in the white bits of the image using my white gel pen, and then used my nesties to cut the whole, and to create a border for the opening. Next, I added a little polar white flowersoft around her feet and on top of her hat for snow. Lastly, I added the "Jo-Bow" that Joanne Basille has been inspiring us all to make!Next I created the matching card. It came together much the say the luminary did, except this time I paper pieced the little girls jacket and hat. I wish I had layered the designer paper on some red cardstock, and there were a few other things I could have done to "step it up" but I was getting close to the deadline so I just needed to finish.I have to say, I love how this set turned out!! I hope you've enjoyed seeing it.